

How To Uninstall Skype For Business Windows 10
Summary :

You lot may take ever heard well-nigh Skype for Business and institute this characteristic sometimes becomes troublesome. This commodity shows you how to disable and uninstall this feature in Windows 10.
Quick Navigation :
- Skype for Business
- Method one: Disable Skype for Business via Skype Settings
- Method 2: Uninstall Skype for Concern via Command Panel
- Method 3: Uninstall Skype for Business via Registry Editor
- User Comments
Skype for Business
Skype for Business, formerly known as Microsoft Lync Server, is a unified communications platform that integrates mutual channels of business communication and online meetings, including instant messaging, presence, video conferencing, and so on.
To put it more than clearly, you can use this characteristic to proactively stay connected with your peers. With this feature, you can communicate with others conveniently in daily life. However, Skype for business organization sometimes brings you some troubles, like eating lots of deejay infinite.
Tip: Sometimes, y'all may run across 100% Disk Usage on Windows 10 caused by the combination of Skype and Google Chrome browser settings. Merely please don't worry, as MiniTool shows effective ways to fix this issue.
Therefore, you tin cull to disable or uninstall Skype for Business from your PC. And this commodity shows some working methods to disable or uninstall Skype for Business.
It is important to notation that if you are using Role 365 Skype for Business, information technology is impossible to uninstall information technology from your figurer unless you remove the reset of the Microsoft Part site.
Method 1: Disable Skype for Business via Skype Settings
To disable this feature to prevent it from starting up, please following the instruction below.
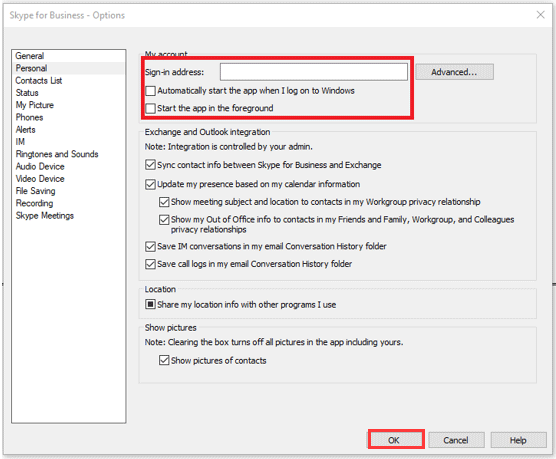
Step one: Open the Settings of Skype for Business, navigate to the Tools tab and cull the Options pick.
Step 2: Select the Personal option from the left side, and uncheck Automatically first the app when I log on to Windows 10 and Start the app in the foreground, and then click the OK button to ostend the changes.
Stride three: Click the Settings button again on the Skype for Business interface and choose File and Exit in order.
After the 3 steps, you accept successfully disabled Skype for Business from your PC and you will no longer see information technology although it is notwithstanding on your computer.
Method 2: Uninstall Skype for Business via Command Panel
This method requires you to clear all your profile cache for the Skype for Business account and so uninstall it from Windows 10 via Control Panel.
Hither is the detailed tutorial on uninstalling Skype for Business.
Step 1: Open your Skype for concern and so sign out of this application.
Footstep 2: In the Sign in interface, delight click the Delete my sign-in info option.
Annotation: This pace will clear all your profile cache for the Skype for Business organisation account and will disable the auto sign-in when the awarding opens.
Footstep 3: Close Skype for Business organization.
Step 4: You should uninstall Skype for Business similar any other software on your computer. Therefore, please go to Control Panel > Programs > Programs and Features > Uninstall or change a program.
Step 5: Choose Skype for Concern and click Uninstall.
Annotation: If you don't see Skype for Business listed, it means that you lot are using a version that is integrated with other Role 365 apps. The only way to uninstall information technology is to remove all of Office from your calculator.

How do you lot make the all-time use of Windows 10? Hither you will find the best tips and tricks for Windows 10.
Method 3: Uninstall Skype for Business concern via Registry Editor
If the above two methods don't piece of work, the third choice is to uninstall information technology in your registry.
Now, let'southward see how to uninstall Skype for concern from Windows 10 via Registry Editor.
Step 1: Press the Windows icon and R fundamental simultaneously. After getting a Run box, please type regedit and click the OK button to access the Registry Editor window.
Annotation: You will erase any Skype records from the Registry. Major issues may happen if you change the Registry improperly. To be prophylactic, it is suggested to support your Registry earlier making whatever modifications.
Stride 2: In the Registry Editor window, please navigate to the Edit tab and and then choose the Find pick.
Step 3: Type Skype for Business into the Observe box and click the Find Next button.
Step 4: Employ correct-click to delete all the search listings.

How to speed up Windows 10? We give you a step-by-pace guide to speed upward reckoner Windows 10 finer.

How To Uninstall Skype For Business Windows 10,
Source: https://www.partitionwizard.com/partitionmanager/uninstall-skype-for-business.html
Posted by: dilworthcenry1987.blogspot.com
0 Response to "How To Uninstall Skype For Business Windows 10"
Post a Comment